Building a server for FreeNAS
Thu, Feb 1, 2018Building a cheap and quiet home server.
Introduction
In this post I am going to go through configuring a home server.
The server I built is a Dell T20. I choose the Dell T20 for the following reasons:
It was quiet.
Inexpensive to buy.
Easy to work with.
Inexpensive to run.
It fitted my needs.
I managed to find my server on Ebay for under €300. It was second hand but I couldn’t fault it as it was still in the original box and it came with 2 SSD’s. 1 SSD was a 120GB Kingston and the second was a 240GB Crucial SSD. All things considered it wasn’t a bad price.
My main use for the server will be for as a NAS for my home network. I also plan to have a few VM’s running on it. These VM’s will be used for testing and developing.
As this servers primary job is a NAS I will be putting the FreeNAS OS on it as its main OS. FreeNAS is a distrution of FreeBSD so it also has the Bhye hypervisor install by default. The Bhye hypervisor is what I will you to run my test and dev VM’s. Another advantage of FreeNAS is the ZFS file system it uses which unparallelled data integrity. It does this by checksumming data when it is written and when it is read. This means that ZFS will never return corrupt data.
You may be thinking at this time why didn’t I use ESXi as the hypervisor. The reason for this is it is not recommended in the FreeNAS documentation to run it as a VM on a hypervisor, as it can lead to data corruption with the FreeNAS ZFS filesystem. The primary use of this server is as a NAS and the last thing I want is to risk the loss of my data, so it was an easy decision with FreeNAS.
Prerequisites
What you will need to follow this guide are the following.
Any server compatible with FreeNAS.
FreeNAS OS.
At least 1 USB device to install the FreeNAS OS.
Hard Drives for FreeNAS to Manage.
Access to a PC and another USB to create a bootable FreeNAS USB.
Good troubleshooting skills.
Patience and Enthusiasm.
My Build
Selecting the parts
The parts I choose for the build are:
Dell T20 Server.
FreeNAS 11 OS.
2 * 32gb SanDisk for FreeNAS OS.
2 * 2TB WD hard drives.
SATA Expansion Card.
2 * 3TB WD hard drives.
2 * 500GB Seagate hard drives that I took out of old sky boxes.
1 * 120GB Kingston SSD.
I said in the intro the reasons the Dell T20 Server and FreeNAS 11 OS were choosen so I will skip them. Originally I had used 2 generic USB’s I had lying around for the FreeNAS build but within 2 months these drives failed and I had to do a full reinstall of the FreeNAS. I choose 32GB SanDisk USB’s as they are good quality, durable and small USB’s so I wouldn’t have to worry about them being hit when the server is moved. I use 2 as you can mirror the FreeNAS OS to give you redundancy in case one ever fails.
The hard drives I mention above, were used as I wanted 2 * RAID 1 arrays on the server. This will give me some redundancy and speed increases. I used the SSD for the VM’s. This was because the CPU of the T20 isn’t the most powerful and doesn’t have hyper threading so to get the VM’s to be as fast as I could possibly make them. I will probably look to update the CPU in the near future.
As I have more hard drives than there is SATA ports on the server I had to purchase a SATA card so I could use all the drives I have.
Fitting drives and expansion card.
First of all open up the T20. Here is a handy little video if you don’t know how.
As you can see in the picture below. There is 6 HDD bays in total. 2 * 2’5 inch bays and 4 * 3’5 inch bays.

Now I recommend that you put your main or biggest drives in the top caddy as it can be difficult to work on especially if you have big hands so you want to put the drives you are least likely to take out in here. The Bottom 2 drive bays can be eaily removed by grabing both sides of the blue caddy insert. The top caddy can be easily pulled out by pushing down the blue clasp. You will have to take off the front bezel to be able to slide it out of the chassis. Now you should see similar to below.
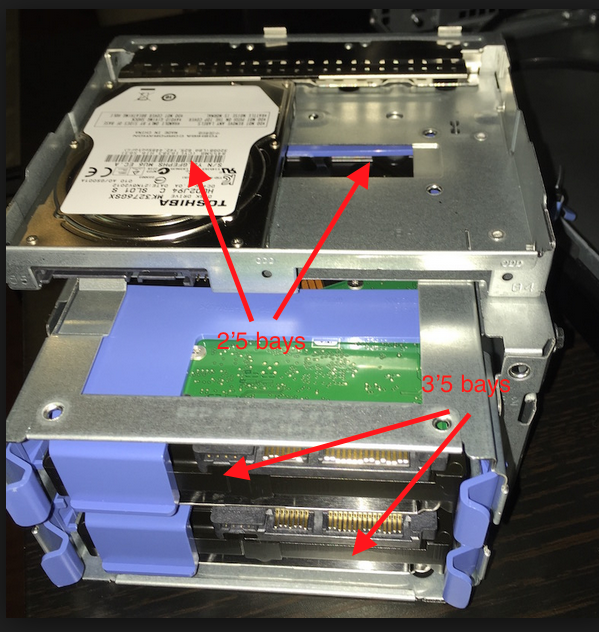
As you can see there is 2 slots for 2’5 HDD’s or for SSD’s. You will need screws to hold the drives in place. The most difficult part is screwing the drives to the bay as access is limited. For the 3’5 drives just pull out the blue bay caddies and push the drives into them and then slide back into the bay.
Installing the SATA Raid Expansion PCIe Card is simple just have a quick look at this video of a similar server. Now connect everything up. E.g. connect the drives to the SATA cables on the server and the expansion bay. In my case I attached 1 raid arrays drives to the servers SATA cables and the other raid array to the Raid card. I also attached the VM’s SSD to the servers own SATA ports.
**Note: **
When selecting hardware for the server make sure it is compatible with FreeNAS for a list of compatible hardware click here.
Confirmation installation
After installing all drives and connecting everything up its best just to make sure the server sees the drives and expansion card. When the server is botting boot into the EFI/BIOS and check to make sure all your drives and expansion cards are detected by the server. Also if you are using expansion cards it would be a good time to check their firmware and download and install firmware updates before proceeding.
Creating Installer USB
I will be explaining how to do this on a MAC, as a MAC is my main machine. For other OS’s please check out the FreeNAS documentation here.
First of all download the newest most stable FreeNAS OS here or check the FreeNAS site if you require a specific version.
Now first insert your USB install drive and open disk utility and select the drive on your MAC. Now unmount any partitions on the drive.
To install the OS we must open a terminal window and find the USB. Once you have a terminal window open run the following command to get a list of all drives.
- diskutil list
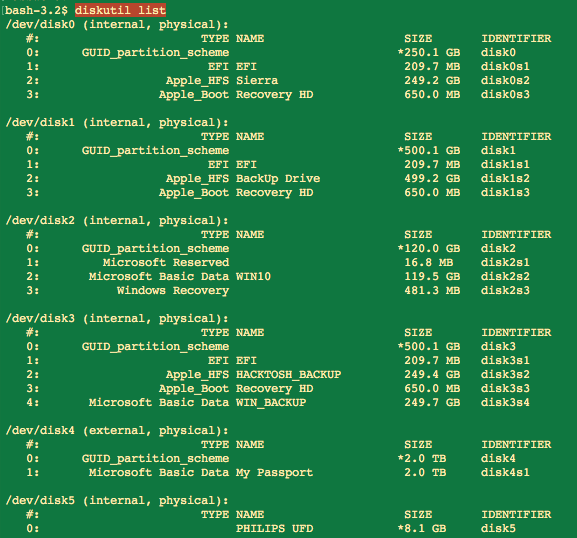
As you can see I have a lot of drives but the drive I will be installing the OS installer on is the last listed drive which is ”/dev/disk5”. If you can’t tell which USB stick, remove the device, run the command again, and compare the difference. Once you know which drive is correct, navigate to the FreeNAS.iso location in the terminal window. Now unmount the usb drive using following command.
- sudo diskutil unmountDisk <drivepath>
After successfully unmounting the drive now use the “dd” command to write to the USB.
- Sudo dd if = FreeNAS - 11.0 - RELEASE.iso of = /dev/rdisk5 bs = 64 k

It may take 10 mins for dd to complete after which it will it returns a message displaying information about how long it took to write the image to the USB.
Installing OS
Before inserting the installer USB, make sure to have the drives you will be installing FreeNAS inserted. As I said before it is best to use at least 2 good quality USB drives for redundancy. You don’t want to have to go through the process of installing the OS again if a drive fails.
After all the destination boot drives and the installer drive is installed, power up the server and boot into the BIOS Boot Manager at the startup screen. You will be prompted with a list of boot drives navigate to the installer USB and press enter.
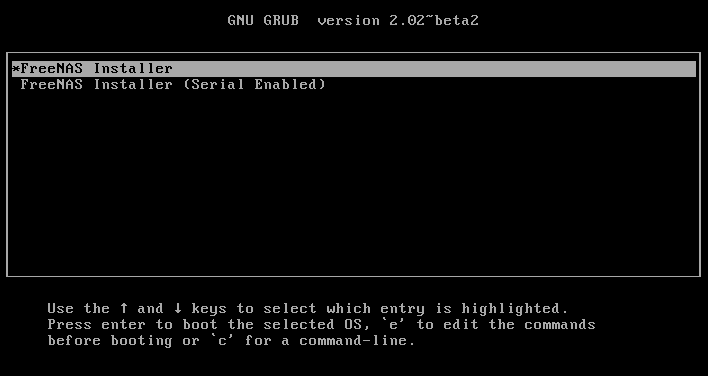
If successful you will be prompted with the familiar grub screen seen on most Linux distributions. When you see the grub screen select and enter the FreeNAS Installer. Don’t select the FreeNAS Installer (serial Enabled) as this is for servers that are accessed via the serial port.
After entering FreeNAS installer you will now be prompted with the
console setup menu. Select the install/upgrade option.

Now you will see a list of drives attached to your server. Select the drive to install FreNAS on by using the space bar.
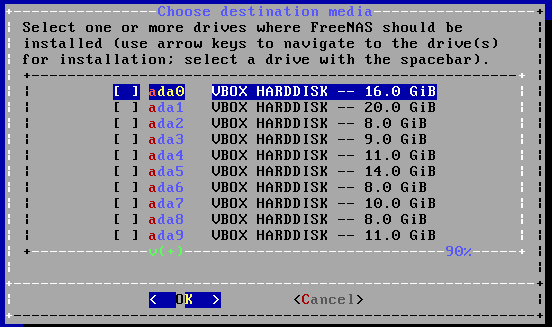
After selecting the drive/s press enter to continue to the screen below.
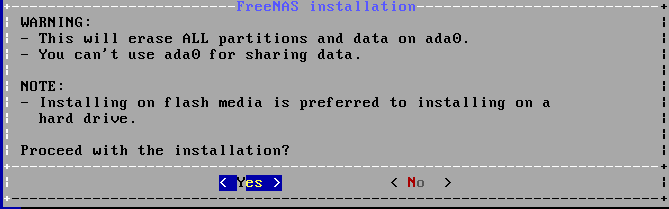
After this prompt you will be asked the install type select “fresh install” and press enter.
Next is the prompt for the root password. Please be sure to select a
strong password with symbols, numbers and letter both upper and
lowercase. 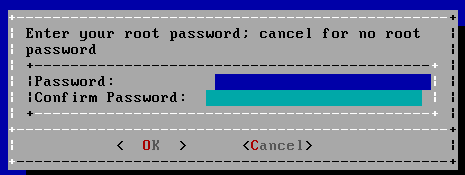
Note:
The root password cannot be blank.
Now to the boot options. FreeNAS can be booted with a standard BIOS or the newer more secure EFI. For my install I choose BIOS as it is recommended.
Finally, you should now see the prompt shown below. Please reboot and
remove the USB
installer.
Now while booting enter the bios again and go to boot order. For the server to boot automatically into FreeNAS put the FreeNAS USB boot drive/s to the top of the boot order list, then save and reboot.
After the reboot the server should boot into FreeNAS and you should see the screen below.
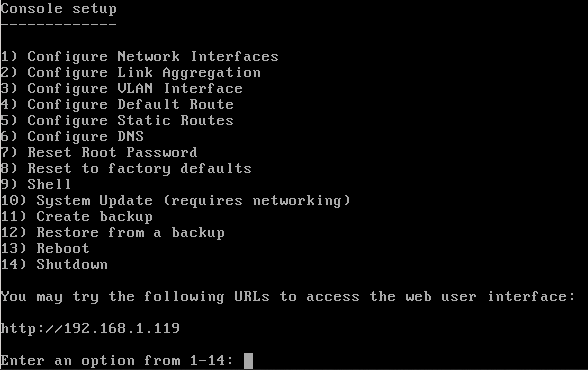
Note:
Depending on your network configuration, FreeNAS may not receive an IP address by default. This is the case with my network as I only have DHCP enabled on WIFI.
Troubleshooting
If you encountered errors during the installation please see the troubleshooting section of the FreeNAS documentation here.